Transaction management is one of the difficult features to understand for the developers and hence I decided to write on this topic. Let us take a look at how the Spring framework does transaction management.
There are 2 types of transaction management namely
- Declarative
- Programmatic
1. Declarative Transaction Management
Declarative transaction management is the most widely used method in which the developers tell the framework to handle the transactions. This can be achieved in 2 ways ie. through XML configurations or through annotations
Now, let us focus only on the annotation part.
We need to include 2 annotations for this to take effect
- @EnableTransactionManagement annotation is usually on the main class. Adding @EnableTransactionManagement annotation creates a PlatformTransactionManager for you — with its JDBC auto-configurations.
@SpringBootApplication
@EnableTransactionManagement
public class Application {
public static void main(String[] args) {
SpringApplication.run(Application.class, args);
}
}
2. @Transactional annotation on a service class or a method
Using Transactional annotation on the class level marks the class as transactional
@Transactional
public class UserService {
public User getUser(String id) {
// DB call
} public User saveUser(User user) {
// DB call
}
Using Transactional annotation on a method also marks that class as transactional
public class UserService {
@Transactional
public User getUser(String id) {
// DB call
}
}
When the UserService is Autowired in any controller / other classes, a proxy of UserService is created and used by those classes. This is illustrated in the diagram below
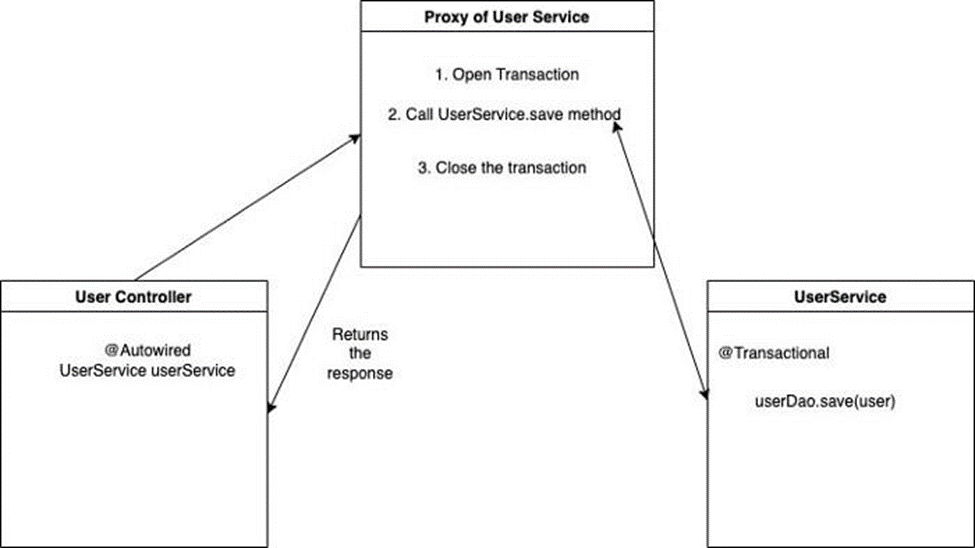
In a nutshell,
- If Spring detects the @Transactional annotation on a bean, it creates a dynamic proxy of that bean.
2. The proxy has access to a transaction manager (which is the PlatformTransactionManager in Spring Boot) and will ask it to open and close transactions/connections.
3. The transaction manager itself will simply use a good, old JDBC connection.
Rollback the transaction
Now, let us talk about the rollback process. If the code segment inside a Transactional method throws a Runtime exception or error, the transaction is automatically rolled back by the framework.
In the below code snippet, a NullPointerException is thrown by the code which is a Runtime exception and hence the transaction is rolled back
public class UserService {@Autowired
UserRespository userRepository;@Transactional
public User getUser(String id) throws UserNotEligibleToDriveException{
User user = userRepository.get(id);//Assume user object is null
//We get NullPointerException on below lineuser.setMobile(“12345678”);//below line not executeduserRepository.save(user)}
}
However, the transaction is not rolled back for the Checked Exceptions.
Consider the following code snippet. In the case of the checked exception below, the user mobile number is set to 12345678 but the transaction is not rolled back because the code throws a Checked Exception.
public class UserService {@Autowired
UserRespository userRepository;@Transactional
public User getUser(String id) throws UserNotEligibleToDriveException{
User user = userRepository.get(id); user.setMobile(“12345678”); //Checked Exception
if(user.age < 18)
throw UserNotEligibleToDriveException(); //below line not executed userRepository.save(user)
}
}
Because the user is a persistent entity, hibernate persists the user object to DB and the new phone number is updated, even though the save method is not executed. But this is not the ideal scenario as we should not save any of the info here and fail the transaction.
We definitely need to roll back the transaction for the above scenario. we can achieve this using rollbackFor attribute.
@Transactional(rollbackFor=UserNotEligibleToDriveException.class)
public User getUser(String id) throws UserNotEligibleToDriveException{ //code here}
We can also specify
rollbackFor=Exception.class to inform Spring Boot to rollback the transaction for any checked exceptions. In this way, we dont need to specify all the checked exceptions thrown by this method
Another way is to extend the RunTimeException and we don’t need to specify rollbackFor attribute
public class UserNotEligibleToDriveException extends RunTimeException{}public class UserService {@Autowired
UserRespository userRepository;@Transactional
public User getUser(String id){
User user = userRepository.get(id);user.setMobile(“12345678”);//Checked Exception
if(user.age < 18)
throw UserNotEligibleToDriveException();//below line not executeduserRepository.save(user)}
}
The above code will be rolled back because we have made UserNotEligibleToDriveException to extend RunTimeException. Butthisdepends on the use case as we are trying to change the type of Exception. In general, it is safe to use rollbackFor attribute to do the rollback of Checked Exceptions
2. Programmatic Transaction Management
We have seen the declarative transaction management above and it was easy to use. But there are scenarios where it does not work well and there comes the Programmatic Transaction Management where developers draw the transaction boundaries inside the service class methods.
Let us consider the following code snippet. We make some DB calls, then we call external API and then again we make DB calls and then we make an internal API Call.
@Transactional
public void completeOrder(OrderRequest request) {
generateOrder(request); // DB call
generateInvoice(request); // DB call
paymentApi(request); // external API call
savePaymentInfo(request); // DB call
createSubscription(request) // DB call
sendInvoiceEmail() // internal API call
}
The @Transactional aspect creates a new EntityManagerand starts a new transaction by borrowing one Connection from the connection pool (HikariCP is the default in Spring Boot)
- The Connection is opened and it starts generating the orders until all the code snippet of the completeOrder method is executed.
- If there is any delay in the payment API, the connection is on hold and it is not returned to the connection pool
- If we have concurrent users doing complete orders, the application will run out of Database Connections resulting in the application lag
- Hence we should not mix the DB and I/O calls inside a Transactional method
This is a very good use case for Programmatic Transaction Management and we use TransactionTemplate for this purpose
@Autowired private TransactionTemplate template;
public void completeOrder(OrderRequest request) { template.execute(
status -> {
generateOrder(request); // DB call
generateInvoice(request); // DB call return request;
});
paymentApi(request); // external API calltemplate.execute(
status -> {
savePaymentInfo(request); // DB call
createSubscription(request) // DB call return request;
});
sendInvoiceEmail() // internal API call
}
In the above snippet, we did not use @Transactional but we have used TransactionTemplate twice and wrapped the DB operations inside. The following steps are performed
- The Template starts a new transaction with a borrowed connection and executes generateOrder and generateInvoice in a single transaction.
- Then the transaction is closed and connection is returned to the connection pool
- payment API call is made
- Then again the template starts a new transaction with a borrowed connection and executes savePaymentInfo and createSubscription in a single transaction.
- Then the transaction is closed and the connection is returned to the connection pool
- Then the internal API call is made and the response is sent to the user.
In this article, we have seen how Spring Boot performs the 2 types of transaction management namely Declarative and Programmatic through diagrams and code snippets.
I work as a freelance Architect at Ontoborn, who are experts in putting together a team needed for building your product. This article was originally published on my personal blog.